 |
| Inserting Pictures using the Image Manager |
 click to enlarge  click to enlarge  click to enlarge |
This is an excellent method for inserting images to give you maximum control and manoeuvrability of your images.
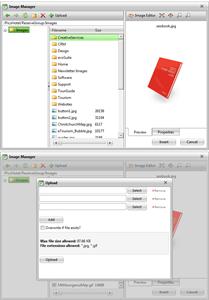
Click in the text box in the place you would like to insert an image and click the “Image Manager” button in the tool bar to open the Image Manager window:
Tools of the image manager:
 |
Refresh
Press refresh if you cannot see changes like new images or new folders etc.
|
 |
New Folder
The image manager allows you to re-organise your images using folders.
|
 |
Delete
Delete the selected image permanently.
Note: If you have previously inserted this image into another page then your viewers may see a red x instead of the image.
|
 |
Upload
Upload a new image from your computer.
|
 |
Image Editor
We highly recommend you edit and resize images using software such as Photoshop before you upload them to your website. However, if this is not possible then you can use the in-built image editor to resize or crop the image.
Note: More information on this in the following sections.
|
 |
Best Fit
Preview the image at the best size to fit in the preview screen.
|
 |
Actual Size
Preview the image at the actual size you uploaded it.
|
 |
Zoom In
Zoom in on the preview to see a larger version of the image.
|
 |
Zoom Out
Zoom out on the preview to see a smaller version of the image.
|
To upload a new image, click the “Upload” button. You must first upload an image from your computer, into your sites image folder, before it can be inserted onto a web page.
Click “Browse” and locate the image on your computer. If you have already uploaded an image of the same name and you would like to overwrite it, click “Overwrite if file exists”. Then click “Upload” and you will be taken back to the image manager.
Note: If you change your mind, click the green “Upload” button at the top of the window to be taken back to the image manager, or click “Cancel” to close the window and go back to editing your page.
Once you have uploaded your file you will be taken back to the image manager. Simply select the correct image and click “Insert” and the image will be placed wherever your cursor was placed.
Once the image has been inserted:
Click on the image to select it and you will notice new editing properties appear below the text box:
- Width: Change the width of the image if needed
- Height: Change the height of the image if needed
- Note: We highly recommend you resize images to the correct height and width before you upload them. Manually changing the height and width after an image has been inserted may distort the image slightly when viewed on the page.
- Alignment: Change the vertical and horizontal alignment of the image
- Classname: Apply a pre-defined style to the image
- Border Color: Apply a border to the image and select the colour
- Border Width: Change the width of the border.
Note: Must be set to at least 1 for any border to appear. Set to 0 to remove the border
- ToolTip: Add a tool tip (also known as “Alt Text” or “Alternative Text”) to be displayed when a user hovers their mouse over the image
- Set Image Properties: Change all the image properties at once using the
Image Properties window
You can also right-click on the image to access the “Image Properties” window, or the “Image Map Editor”.
Image Map editor:
You can use the image map editor to add one or more links on an image.
- First, select your image and either click the “Image Map” icon or right-click on the image and select “Image Map Editor”.
-
- Choose your link area shape: Rectangle or Circle
- Click “New Area” and a link area will be placed on the image with a red square in the corner
- Click and drag on the red square to resize the link area to the correct size
- Click and drag on the link area to position it on the image
- Alternatively you can use the Left/Top and Width/Height properties to position and resize the link area
- URL: Type or copy & paste the URL of the website you want to link to
- Target: Select “New Window” if you are linking to an external website, or “Same Window” if you are linking to another page on your own website
- Comment: Add a comment (“Tool Tip” or “Alt Text”) to be displayed when a user hovers the mouse over the image
- Click “Update Area” to apply this link area
- Click “New Area” again if you would like to create multiple link areas
- Once you are finished, click “OK” and remember to save your changes.
|
|
|
|
 |