 click to enlarge  click to enlarge  click to enlarge |
If you need to display tabulated data, you will want to insert a table into your page. You can also use these for layout of text and images if needed.
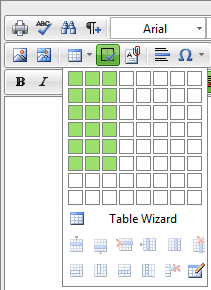
- To insert a table, click on the “Insert Table” icon.
To define the size of your table, either:
Option One: Hover your mouse over the dropdown and click to select the
size of your table
Option Two: Choose the “Table Wizard” to build your table.
Either way, you can easily add columns or rows to your table at any stage after it has been created.
- Table Design: Use this function to add and delete rows and columnsto your table
- Table Properties: Change the height, width, cell spacing, cell padding
alignment, background colour etc. See Step Two for more details
- Cell Properties: Apply changes in height, width, alignment and
background colour to individual cells in the table.
See Step Two for more details
- Accessibility: Allows you to give your table a title and control the
width of the title in relation to the width of the table
- Once the table has been inserted click on the table to select it and you will notice new editing properties appear below the text box:
- Width: Force the minimum width of the table
- Height: Force the minimum height of the table
- Note: Your table may exceed these values if you choose to insert text or images that take up more space.
- Cell Spacing: The amount of space between each cell
- Cell Padding: The amount of space between the text and the inside edge of each cell
- Alignment: The horizontal and vertical alignment of the contentwithin the cells
- Background: Apply a background colour to the whole table
- Classname: Apply a predefined style to the table
- Border color: Change the colour of the border of the table
- Border Width: Increase or decrease the border size of the table
Note: This must be set to at least 1 to show any border. Set this value to 0 to remove the border
- Set Table Properties: Open the Table Wizard to change all the table properties
You can also click in any individual cell to view the properties of that cell in the same way.
If you right-click in any cell on the table you can access a menu of other short-cut commands that can otherwise be accessed from the Table Wizard.
These can be used to insert or remove rows or columns, or also allow more complex changes like merging cells.