 click to enlarge  click to enlarge  click to enlarge |
If you have using Microsoft Outlook 2003, here are some steps to follow to set up the email signature:
- On the menu bar, click “Tools”
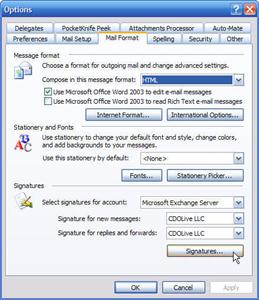
- Click “Options”. This will bring up the email options dialogue box.
- Click on the “Mail Format” tab at the top of the dialogue box.
- Now click on the “Signatures” button. This will bring up the “Create Signature” dialogue box.
- Click “New” to create a new signature, or click on an existing signature and then click “Edit”.
- Fill in the box that pops up:
- Choose a name for the Signature
- Select the radio button “Use this file as a template”.
- Click “Browse” and navigate to where you have saved the '.html' file that you were supplied.
- Then click “Next” and you will be shown a preview of the signature. You can add further text here if you wish.
- Click “Finish”. You will be taken back to the “Create Signature” dialogue box. Click “OK”.
- Now back in the email options dialogue box, click on each of the drop down boxes “signature for new messages” and “signature for replies and forwards” and select the signature that you have created.
- Click “OK” and you’re ready to go!
- Now when you type an email, the signature will automatically be placed into the email and the cursor will be above it. You will need to move the mouse and click between the two images to be ready to type your email.
If you use Outlook Express or another email program, the steps will be slightly different, but should be along the same lines. If you have any problems, feel free to contact us on support@reservegroup.co.nz or phone +64 7 541 1111.